Monday, April 25, 2011

Basic cell phone signal booster


I have shifted to work in an office within a basement... obvious consequence: low cell phone signal, battery drainage, missed calls and calls that get cut.

I wanted to try out a cell-phone signal passive repeater, but for that you need 2 antennas, and so far, I've been able to get only one. But it is already helping me!

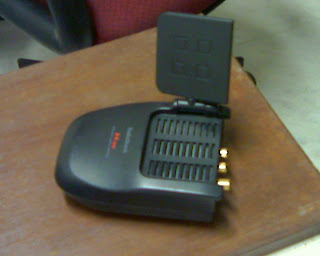
It is a small antenna from a surveillance system with wireless cameras (picture below).


With this small antenna, I just have to open the receiving plate, place my cell-phone right in front of it, and in a matter of a few seconds, the signal goes from practically null to about 80%. 


This helps only for avoiding battery drainage and missed calls, because once you move the cell-phone far from the antenna (i.e. when you speak on the phone during a call) the signal again reduces a lot... but is quite some help for something that took no effort at all.

I hope I manage to get another antenna so as to try out the passive signal repeater soon.
Thursday, April 14, 2011

Standard password for Airtel modem 220BX

The other day I spent some time trying to figure out what was the password to reach the configuration of the modem so as to be able to install a wifi network (http://jamodiy.blogspot.com/2011/04/connecting-wireless-router-to-switch-to.html).

Finally, after some time I came across this other web-site which game the answer:

Username: admin
Password: password

Connecting a wireless router to a switch to an Airtel ADSL modem

When I arrived there was no wireless network here. The Airtel ADSL modem was distributing the wired network to all computers through a switch.

It took me sometime to find out how to do this until I came across this information on how to connect a router to a router:


Suppose you have an ADSL modem with a four port router (e.g., a D-Link DSL504 ADSL Modem/Router or 2Wire 2701HGV-W). You've bought a second router (e.g., a Belkin 54Mbps Wireless 802.11g) and want to plug this into the network to add in and to share more local machines, and to share the Internet connection. Let's refer to the first ADSL router as router A and the second as router B.

Configure router A to issue DHCP addresses in some range that does not include one IP address that we will use for router B For example, router A might only issue IP's in the range starting at 192.168.0.2 and ending at 192.168.0.33 and we'll configure router B with 192.168.0.40. This is all the setup that is required for router A, which otherwise has DHCP enabled and its usual WAN setup for your ISP.

Disable DHCP for router B, and configure its WAN (Wide Area Network) type to be STATIC and set it to any IP (e.g., 192.168.111.2--should be different to the A network), with a netmask of 255.255.255.0. Specify a gateway IP of 0.0.0.0 (or perhaps 192.168.111.1, if your router will not allow 0.0.0.0). This will stop it sending traffic to its WAN (we won't be using this router's WAN connection).

The LAN (local area network) configuration for router B should be set to STATIC with an IP address within the subnet range of router A but outside its DHCP range. We might set the LAN IP to 192.168.0.40 (or 10.0.0.137) with a Subnet Mask of 255.255.255.255 (or 255.255.255.254 perhaps if that doesn't work) and with DHCP Disabled. In fact, router A will serve as the DHCP server for anything connected to router B.

Make sure that nothing is plugged into router B's WAN. Connect a LAN ethernet port of router B to a LAN ethernet port of router A to have them talking to each other, using the usual ethernet cable that you would use to plug your computer into the router.

Source: http://togaware.com/linux/survivor/Router_Router.html

Although the Airtel ADSL modem 220BX I have here is not a router, it is the one providing the DHCP, therefore, it should be treated as if it was the router itself.

Keep in mind that the switch is a totally passive device and there is no configuration you have to do on it.

The only change I had to do with respect to the information from togaware.com is that the Subnet mask for the network of router B couldn't be 255.255.255.255, or 254, but had to be 255.255.255.0, and I had no problem about it.

Also, it could be a good idea that you assigned static IPs to the computers and laptops that will be connected through the wifi network, otherwise there maybe some IP clashing with the wired computers (as the wifi network is getting IP assignment from the modem, but is not included in the DHCP list).

Saturday, March 12, 2011

Make HP printer think there is a new catridge after catridge refill

I read this information:


While a Hewlett Packard (HP) inkjet cartridge can be refilled easily, getting it to work again in the printer is another matter. The contacts on the back of the cartridge are programmed to read the ink level, but they don't reset for the printer just because you add more ink. You must get the printer to recognize the cartridge as new. You can do this easily if you have two other old cartridges, or you can manipulate the contacts on the refilled cartridge.
Difficulty: Moderate

Instructions

Things You'll Need:

  • Adhesive tape
  1. Insert the cartridge you refilled into the HP printer. Have the printer print an alignment page, thus recognizing the cartridge. The printer will still read the ink level as where it was before you refilled it.
  2. Remove the cartridge from the printer and replace it with another old cartridge. Have the printer print an alignment page with this cartridge so it recognizes it as a different cartridge from the first one.
  3. Replace the second cartridge with a third one and run the same alignment page. Because the printer only retains the memory of two print cartridges, it will erase the memory of the first (refilled) cartridge.
  4. Insert the refilled cartridge into the printer. The printer will now recognize the cartridge as being full.

  1.  Second option:
     1
    Tape over the contact squares on the top left corner of the cartridge's contacts. Insert the cartridge into the printer and run an alignment page. Ignore any messages that might appear saying there is a problem with the cartridge.

  2. Take the cartridge out of the printer. Remove the tape from the left corner and tape over the contact squares on the top right corner. Place the cartridge back in and run another alignment page.

  3. Remove and reinsert the cartridge, this time with no tape on any of the contacts. Check to see if the printer recognizes the cartridge as being full.

  4. Repeat the above steps if the cartridge is still shown as being empty. This time, use the bottom corner contact squares instead of the top ones. If you are still unable to reset the cartridges, using multiple cartridges is likely the only way to do it.

    In my case, I only have two cartridges, so I did a combination of both techniques. I put the old one (without ink), then the same one covering some of the contacts with tape, then again the same one, covering other contacts... finally the refilled cartridge... and it seems to be working!

    By the way, I have an HP Deskjet F4185

    Monday, March 7, 2011

    Scan and send a signed contract as PDF

    After signing the contract, you scan the pages, and each of them will come to you as jpeg (or some other format) image file.

    Then, print to pdf each of these images. Now, you have a bunch of PDF files.

    If you have ubuntu, then you can merge the pdf files into one, using these instructions:

    http://ubuntuhowtos.com/howtos/merge_pdf_files

    First of all you will need the program called pdftk. You can get it by opening terminal and typing:

    sudo apt-get install pdftk

    Now you can merge pdf files by putting them in the same directory and typing:

    pdftk 1.pdf 2.pdf 3.pdf cat output merged.pdf

    or if you wish to merge files in alphabetical order you can simply type:

    pdftk *.pdf cat output merged.pdf

    If you use this last command, make sure you don't have any other files there in pdf format which you don't want to be merged with your contract (or any other document, of course).

    Friday, March 4, 2011

    Garbage bin staining the wall

    Our garbage bin had been for the past few years staining the wall behind it because every time somebody tried opening it with the foot, it was pushed backwards and would make contact with the white wall behind it. We had somehow got used to live with the fact of that big stain on the wall.

    We have painted recently, and I decided to do something about this stain so that it wouldn't appear again. Here is what we did: we put two door stoppers at the bottom back of the bin.

    First we cut two rectangular pieces of wood.


    (Hmmm... the floaters instead of shoes... I guess we need to improve in safety at work)

    We placed these pieces of wood inside the bin, at the back, i.e. behind the points where the stoppers will go.

    Then we drilled two holes of the respective size for the screws, going from outside, through the bin and reaching the wood. As you can imagine, the wood is to give strength for holding the screws that will hold the stoppers.


    Finally, of course, we screwed the stoppers, and viola, the bin doesn't touch the wall, unless you really force it to!

    Automatic Word Completion Problems with OpenOffice.org

    I was having problems with the word completion while working on the translation of a large manual. I thought it was a problem that the word completion was not working properly, so I searched for how to switch it off... and this is what I found:


    How do you turn off the automatic word completion behavior?


    1. Open a text document.
    2. From the pulldown menus, select Tools > AutoCorrect Options.
    3. Select the Word Completion tab.
    4. Deselect the check box to the left of "Enable word completion".
    5. Click OK.


    1. For OpenOffice.org 3.2, open a text document.
    2. From the pulldown menus, select Format > AutoCorrect > AutoCorrect Options.
    3. Select the Word Completion tab.
    4. Deselect the check box to the left of "Enable word completion".
    5. Click OK
    (from: http://wiki.services.openoffice.org/wiki/Documentation/FAQ/Writer/AutomaticFunctions/How_do_I_turn_off_automatic_word_completion%3F )

    When I went to the settings, before turning it off, I decided to try deleting all the previous entries... they were several thousands I guess.

    After deleting them, now is working much better, remembering new entries, thus guessing well and not giving me wrong guesses, that cause misspellings.