Monday, August 16, 2010

Cover up broken mirror

A few months ago, when moving a piece of furniture, suddenly a mirror inside it slipped down and broke part of the lower part. I had to cover this and finally did it yesterday.


1.I inverted the mirror so as to leave the broken side on the top, so that the weight of the mirror wouldn’t fall on that side and could break further (this I did the same day it broke of course)...


2.Get a long (as long as the mirror) piece of cartuline of a colour that would match with the rest of the furniture... you may need the help of a friend who knows about that stuff, I don’t! He he.
3.Define the width that you want it to cover and fold the cartuline in two parts so that the final width is the desired width.
4.Stick with cello tape the cartuline to the mirror (where there is mirror)
5.Nail (1/2” nails) or staple (with staple gun) the back of the folding of the cartuline to the backing of your mirror wherever you can reach it through the broken section of the same.


6.Stick the front folding to the back with glue or cello tape.


I am taking advantage to also paste some postcards along the cartuline as it is just next to my desk!


An obvious alternate solution is to change the mirror... at least not for now.

Convert 3gp video to flv in Ubuntu

1.Transfer the video from your cell-phone to the computer.
2.Upload the video in 3gp format to YouTube. Don’t worry if in your computer you cannot hear any sound, it is there, but you just don’t have the codec to play it.
3.Save the video as private... unless of course you don’t mind anybody seeing that unedited video.
4.Play the video from YouTube in your browser
5.Go to the tmp folder, it will now be there in flv format.

3gp is a video format which I get when filming videos from my cell-phone (which has Windows Mobile). They maybe can be played in Windows, but not in Ubuntu... typical, Windows making life difficult for those who don’t want to pay them (or make pirate copies). I have read other ways to convert the video, but somehow didn’t manage to make them work after several attempts.

Of course, once you have it in flv, you can convert it to any other format using ffmpeg.

Reinserting a screw from a table that had fallen

The table top is connected to the base at 4 points with 4 screws, 3” each of them... rather, a little shorter than that, but more than 2”... don’t ask me more about those screws, because I don’t know! But that’s the way they were.


One day, after removing the top so as to move the table outside the room for an event, we were not able to put back the screw... as much as we screwed it, it would just slide out.


So, I got a longer and fatter screw. This one must really be 3 inches long. Made sure it wouldn’t go through and through the table top and screwed it in. Worked perfectly well.


My second option, if the screw had been too long for the table top, would have been to insert extra wood in the hole. That would create a sort of sleeve that would make the screw hold the table top to the base. I guess it should have worked as well.

Saturday, August 14, 2010

Fix power wire that easily comes out of the plug

Material:

1. 1 inch wide velcro

2. 1/2" nails and hammer , or staple gun (with staples, of course!)


Steps:

  1. Cut some 7-10 cm of velcro.
  2. Take the rough part (the one that doesn't have the soft hair) and hold it on the same surface where the plug is, nearby it.
  3. Fix the velcro section to the surface using the nails (or the staples).
  4. Fix the other part of the velcro (the one with the soft hair) on the first part, and put nails/staples over it.
  5. Pass the wire between the two parts of the velcro, and close it fully.

That's it, now the wire won't move and will not come out of the plug.

I did this because in the study room which we have at the Study Center, there are two study tables (too much "study" in this sentence, sorry), which have four table lamps. The lamps are connected to a mini-network of the tables. At first, the plugs were new and wouldn't come out of their place, after 8 years they have become loose and any slight touch would take them out of their place.

Wednesday, August 11, 2010

Set up Router as a repeater (bridge) to extend Wi-fi range

I shifted my place of work from one room to another in the same flat. The modem is hard to move, and the router I bought does not have enough signal power to reach the new room where I work from. After many attempts of using reflectors and other devices to increase the antenna power of the router... I decided to buy a new router. Here goes what I did:

(If some of the terms like IP, DHCP, MAC, etc, sound difficult now, don't worry, go ahead and once you start doing things with the router you will understand them all)

1. Buy second router of the same brand as the first one. It may work with different brands as well, but this minimizes the errors, I think. Do confirm that the router has the capacity to be used as a bridge before buying the second router. In my case, I'm using: PN-11N WRT - 11N Wireless Router

2. Switch on your new router and connect it through LAN to your computer (if you have two computers it will help a lot).

3. Browse to the configuration page of the router, e.g. http://192.168.1.1

4. Change IP address of the router to anything else (e.g. 192.168.1.10), reboot the router for this to take effect.


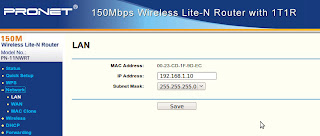
5. Browse again to the router, this time to the new IP. In my case http://192,168.1.10

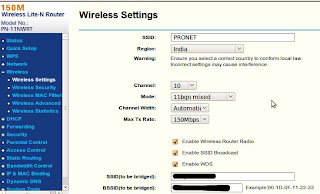
6. Go the wireless settings and enable "WDS". From the router help you can read:
Enable WDS - You can select this to enable WDS, with this function, the Router can bridge two or more Wlans. NOTE: If this checkbox is selected, you had better make sure the following settings are correct.


7. If there is a "Search" option, click on it to find the router to which you want to connect. Of course, make sure that that router is ON!
If there is no Search function, enter the SSID (the name of the router) and the BSSID (the MAC address of the router) of the router you want to connect with.


8. Enter the right Key type of the first router and the password to connect to it. Click on Save.

9. Go to the Wireless Security options and enter the Key type and password. I think these could be different from the other, but I took the same.

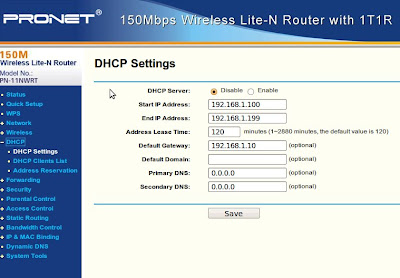
10. Go to DHCP Settings and disable them. Save.

11. Reboot the router (soft-reboot of course).

By now the router should work as a bridge, catching the signal from the first router and repeating it. The one actually assigning IPs to the computers connected to it is the first router (that's why you disabled DHCP).

Make sure the bridge router gets good enough signal from the first router so that it can repeat it. In my case I had to place the bridge outdoors (well protected... I hope) so as to be able to get the signal required.